I have the latest version of the Turris Omnia, which comes with Wifi 6 already built in.
Unfortunately, I did not manage to remove the stands for the cards in order to change their positions. Apparently, unlike what you see in the video, they are not screwed to the board but pressed into the holes.
Can anyone help here? How do I remove them properly without damaging the board and put them to their new positions?
3 Likes
If I recall correctly, the press fit ones are in the longest positions, so don’t need to be removed. You’ll need to buy new ones for the other positions.
Thanks for your answer, but I’m afraid you are wrong.
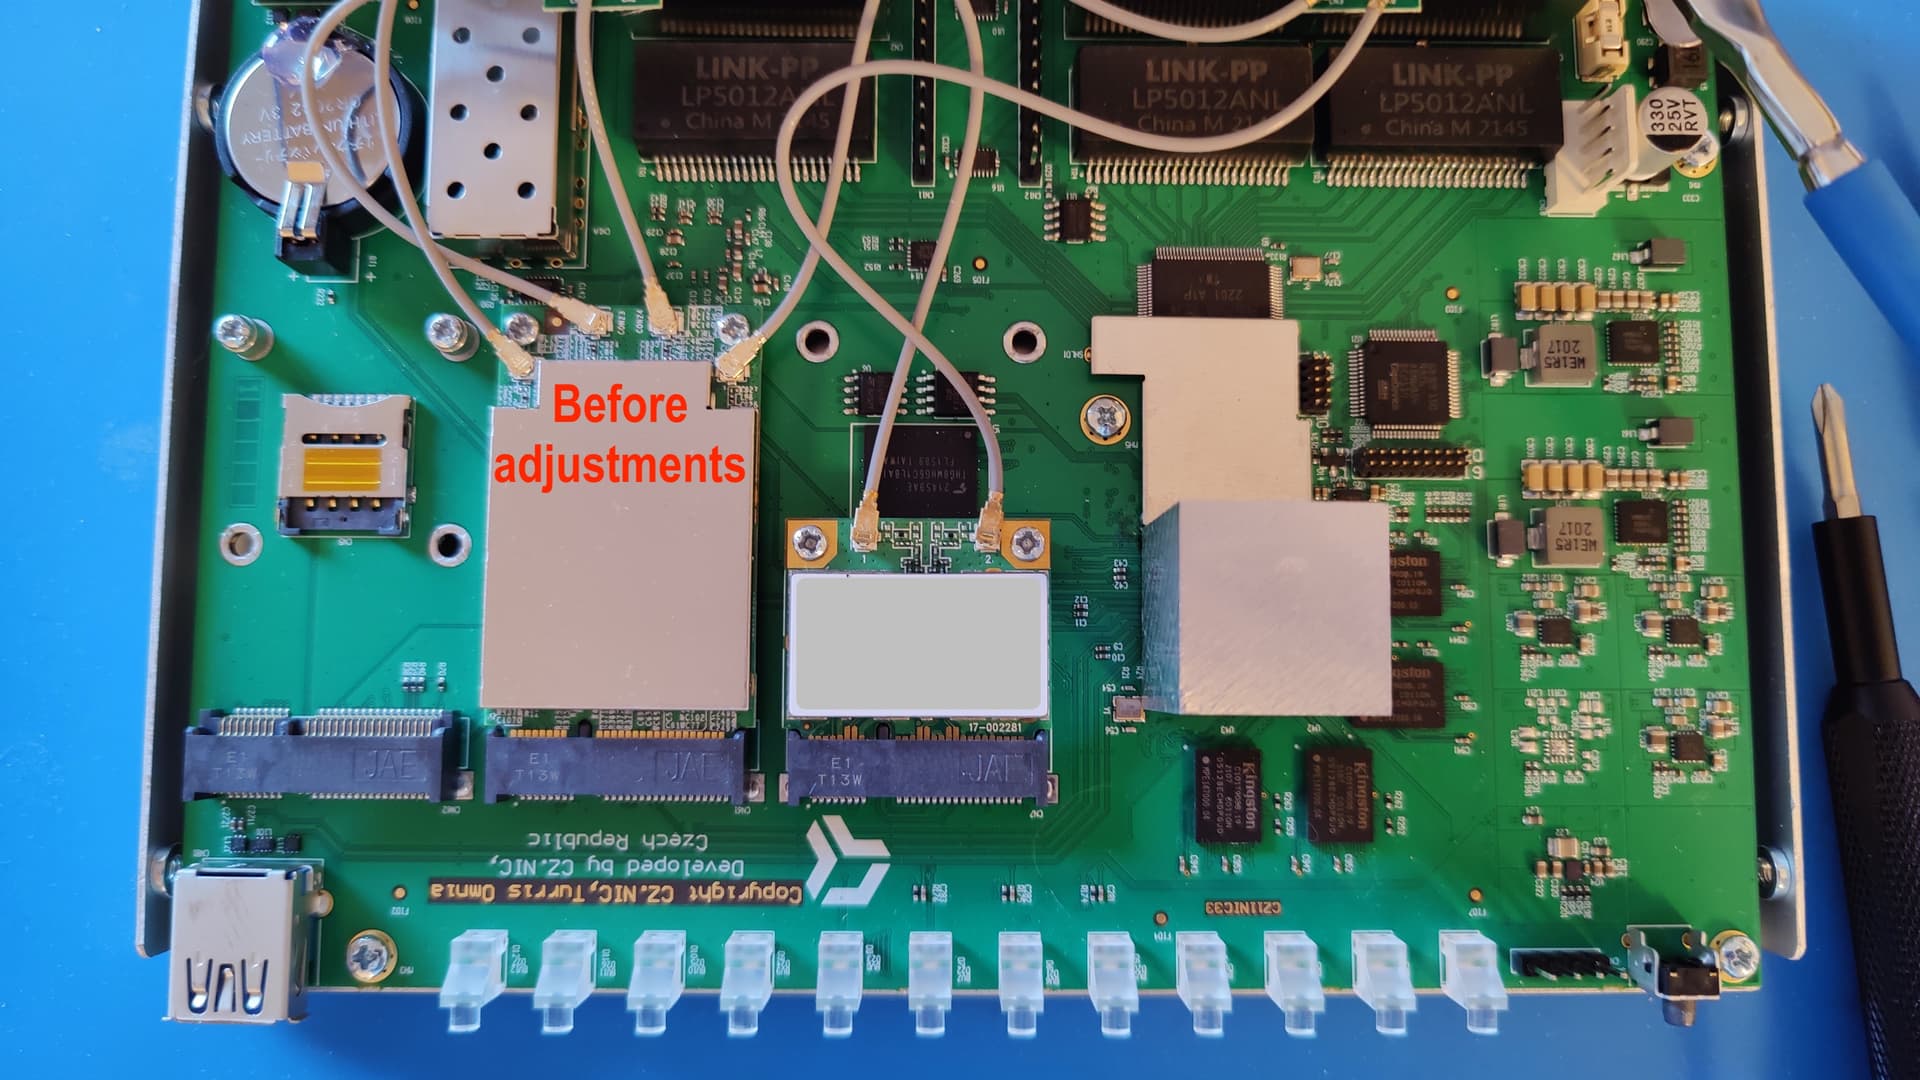
From the left to the right: long position for spacers (empty), long (long WIFI card), short (short WIFI card) - as shown in the video.
You have to move the WIFI cards to the left, so the positions will be:
long (long WIFI card), long (short WIFI card), short (long SSD card)
There are at least two slots where the positions of the spacers have to be changed.
Because I think the SSD can only be installed in the rightmost slot.
So you’ll have to change the spacers positions for two slots.
(Here’s the video in case you don’t know: Turris Omnia: How to connect an mSATA disk - YouTube )
Sorry: At least one slot. Because to change a slot from long cards to short ones by just adding new spacers but not removing the old ones is no problem, but the other way round is.
I found a set of M3 spacers I bought several years ago for my raspberrys. The diameter seem to fit. But the shortest ones have a length of 6mm - I hope this is not too long.
I found a solution. The spacers I bought for my Raspberry are a bit longer than the spacers already on the board. So it’s possible to mount the SSD card slightly slanted over the short spacers and avoid contact.
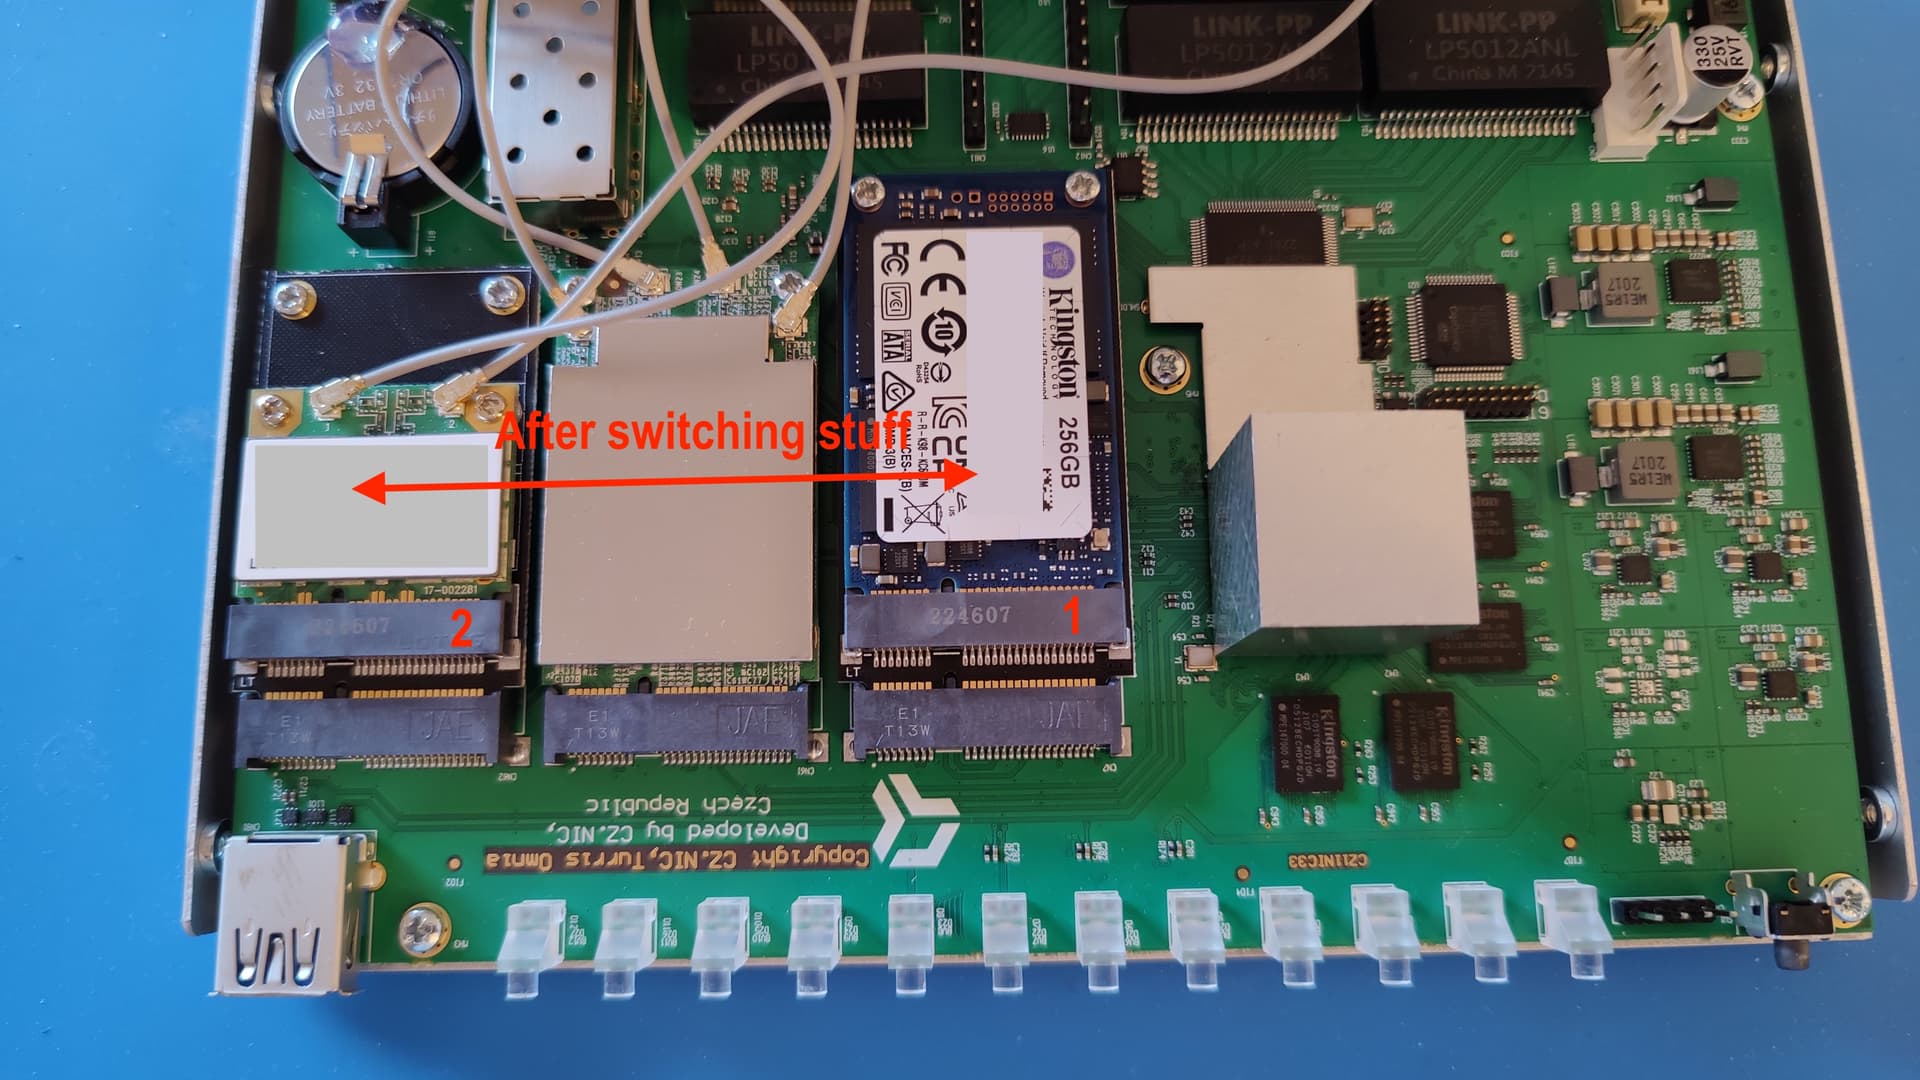
My SSD is installed now and works. (And WLAN as well on the new positions.)
One hint: After the WLAN cards have been moved to their new positions, the old WLAN configuration is gone and must be done again.
1 Like
Oh dear.
I wonder if moving to press fit posts was to mitigate the issue they had early on with spacers becoming unscrewed after assembly.
I had some loose spacers when I got mine, the Indigogo version.
I’m not sure if that’s the reason. Maybe it’s just cheaper. And additionally the video showing an old version of the board misleads you if you check that before you order the router.
I have already sent an email to support suggesting that they at least make a new video.
I am very curious to see what they suggest in it about how to install the SSD.
1 Like
Hi all,
I faced exactly the same issue @Lagganmhouillin described and, I must say, before receiving my WiFi6 Omnia I couldn’t believe that such “super upgradable and expandable” device had such an annoying limitation, but that is that. I didn’t have anything at home to solve, so I searched a couple of days before finding the spacers with proper diameter and length to obtain the result @Lagganmhouillin was speaking about. By the way, many thanks for the precious suggestion @Lagganmhouillin.
For sake of future reference, new buyers should know that press fit posts cannot be removed without risking to damage the board, but probably using a PCB drill press, that maybe I wouldn’t try anyway, considering the price of the device.
The spacers holes on the Turris Omnia are ~M3 size, but those on the cards (WiFi, miniSATA SSD, etc…) are M2 size (~2.5mm), so the smaller wins in this case. Using 6mm M2 spacers and placing a washer before the screw, its head holds in perfect position, even for accuracy maniacs. I added another washer also between spacer and board to add 1mm extra (~7mm total). Most important fact, the card slanting seems do not affect the functionality and it’s sufficient to avoid any contact between miniSATA card and press fit posts.
The miniSATA SSD installation instructions video on YouTube should really be updated.
As @jklaas was wondering, there is probably a reason for all this, and considering which great device is the Omnia overall, I won’t complain more, but please, in the next version, make users life easier…
Cheers 
1 Like
Hello everyone,
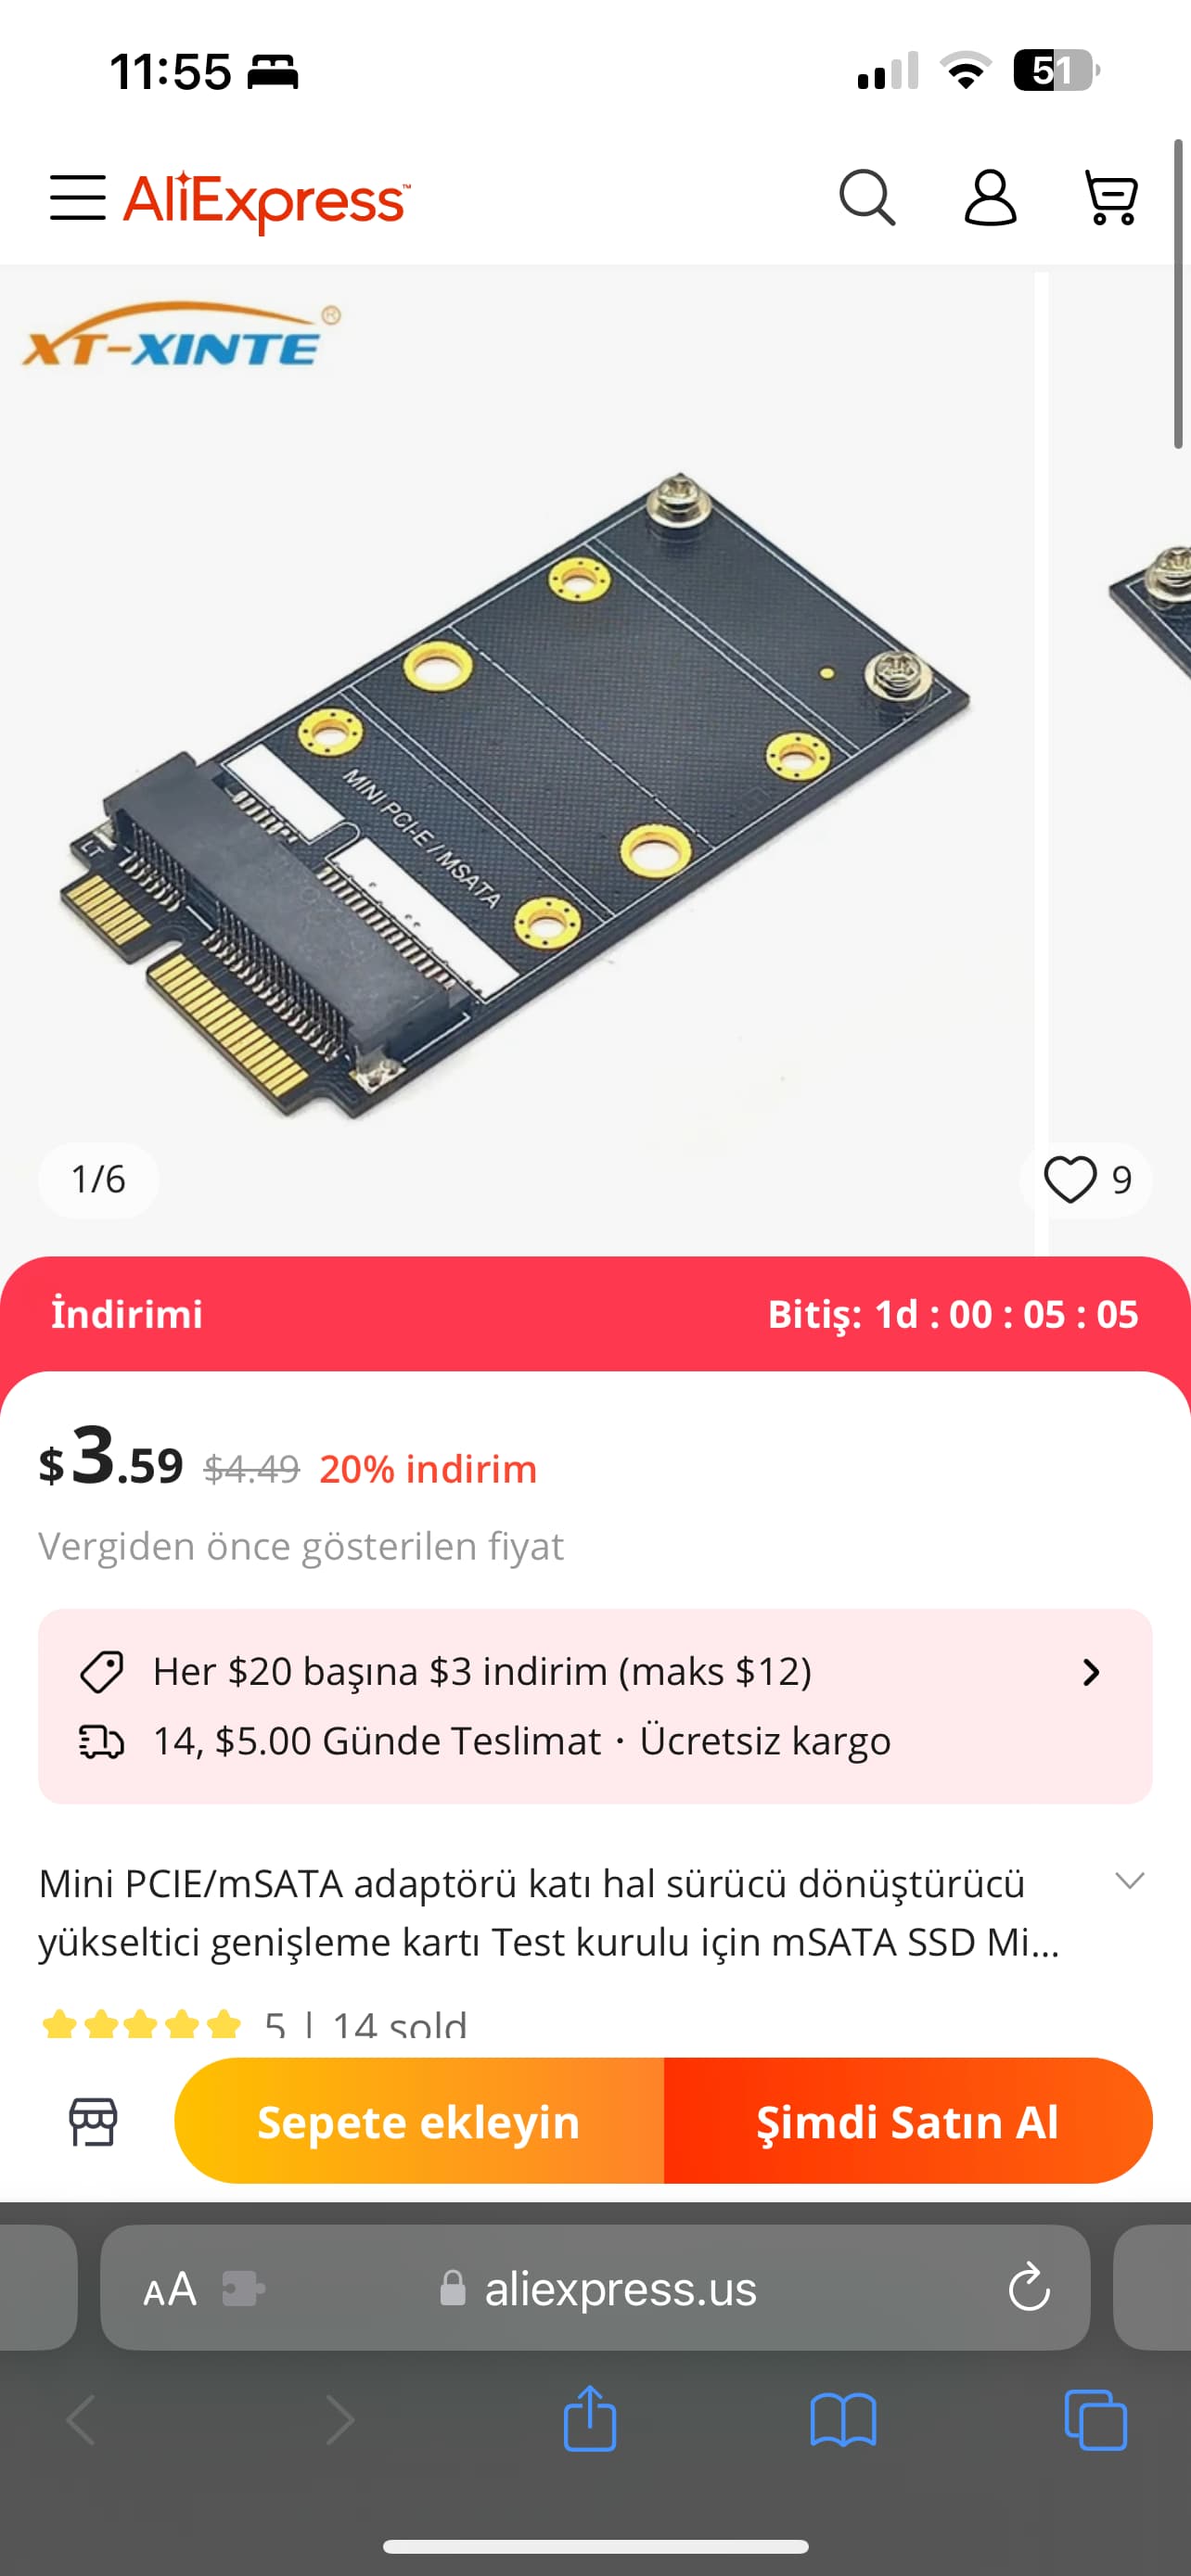
I have the same problem and the only solution proposed by support (contacted by email) is to use spacers. So I chose another solution with these adapters, to offset the cards. I’ll keep you posted on the rest …
Best regards
1 Like
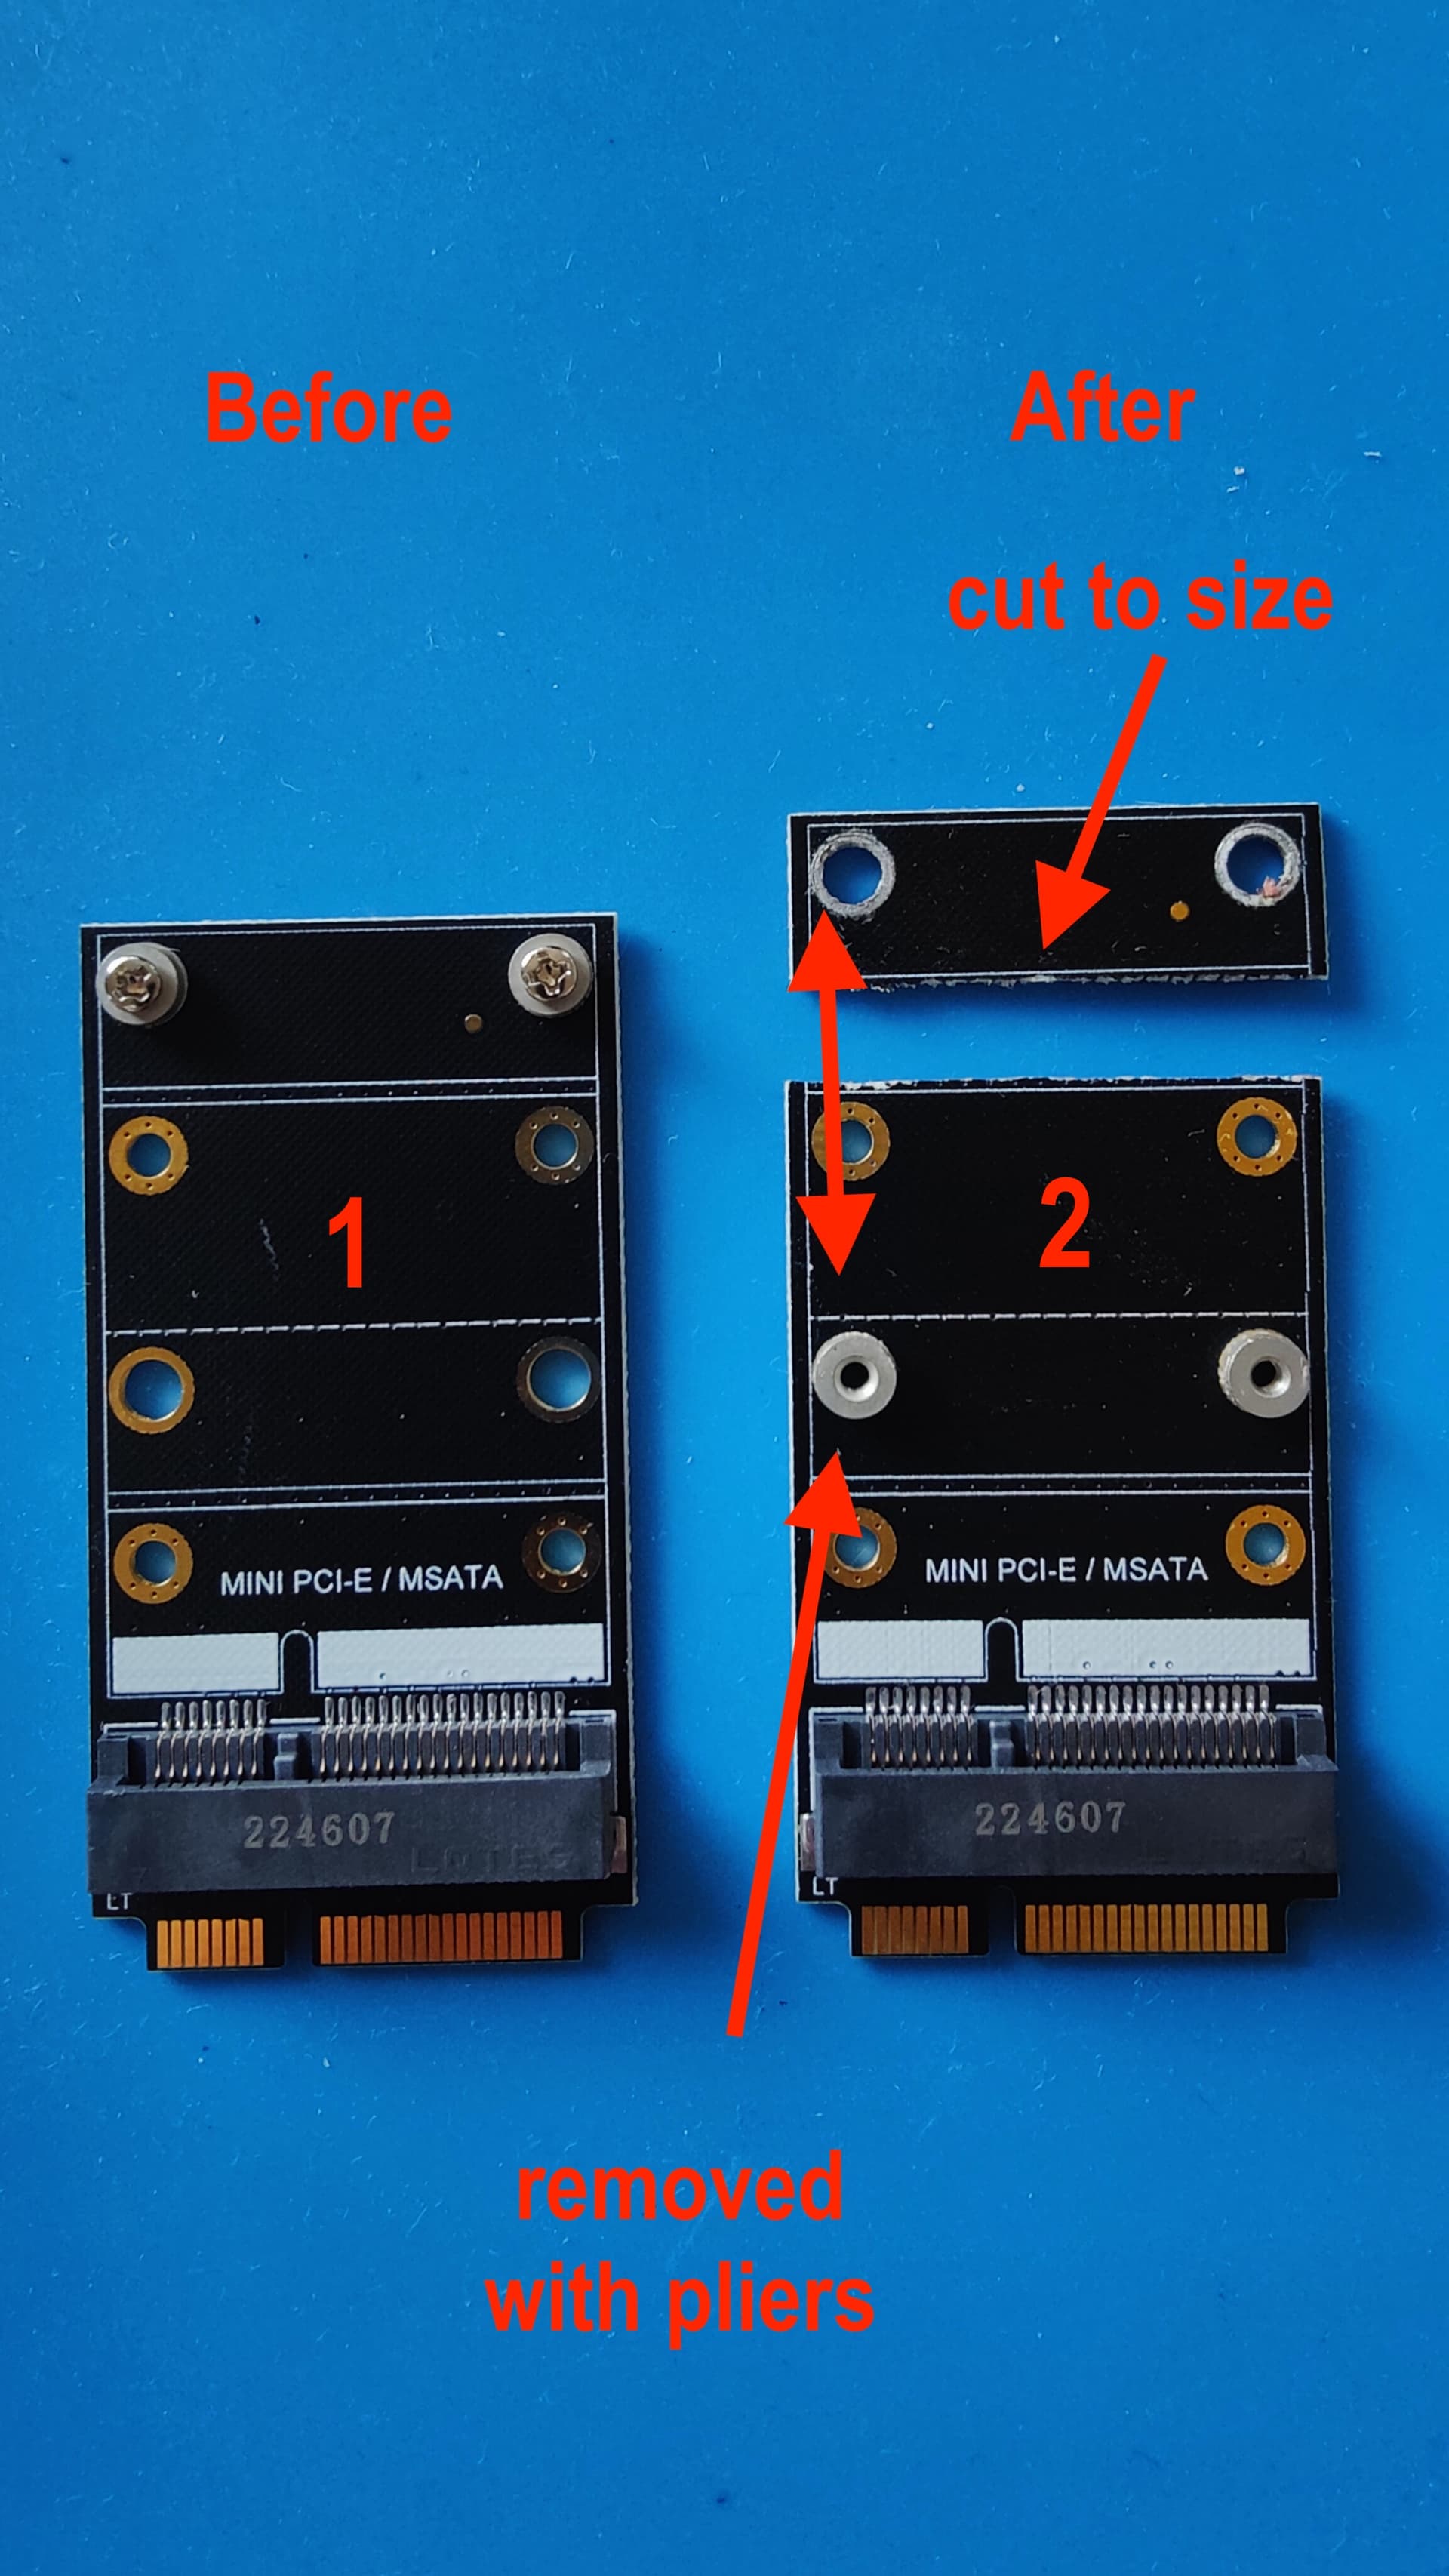
I have received the material (x2). I adapted the first one for the wifi card on the left because it was too long, by cutting it with a cutter. The second one remains unchanged.
It’s also necessary to move the spacers with pliers for the first one and put them back in the right places. It’s easy to do, and the assembly seems sturdy (for home use, not space). The cards are well recognized, but you’ll need to re-set the wifi parameters, as changing the location will cause the configuration to jump. The ssd is perfectly recognized, formatted and usable.
All in all, the cost of the two cards is modest, it works and preserves the original card. But it’s a shame to have to go through this. Turris should have provided for this with movable spacers.
Replacing the screwed spacers with pressed ones is definitively a huge fail from a usability perspective. Please revert that change in the next revision. Even better would be to modify the design to enable users to install an m.2 board without messing with the spacers in the first place. Seems to be a common enough use case.
Otherwise a great product though.
1 Like
Hey guys,
What is the length of the spacers needed to match those currently in the router please? 7mm?
Once I install the adaptors, I hat length do I need to mount the wifi cards onto the adaptors? Also 7 or shorter?
It looks I can pick and choose any length I need. (See photo)
Thank you!

That depends on what you want to do with it. If you need spacers that are exactly the same length as the ones already fitted, then in my experience 6mm is too long because the ones fitted are shorter.
However, if a long card is to be installed in a place where the spacers are pressed in at the short positions, then the spacers must be longer than the fixed ones, as I described in my post above.
In this case it depends on the card, namely whether the card can be mounted in such a way that there is no contact with the pressed-in spacers. In my case, this was possible with 6mm spacers, as stated in my article.
If possible, however, I would rather implement William’s solution, as it is much cleaner. If I had been able to get such an adapter, I would have solved it in the same way, but unfortunately I haven’t found one
(Thanks for the detailed description and the pictures!)
Thanks for the reply. I found them thanks to this topic.
If I understand correctly I just need to move the spacers with pliers if I had to. I’m replacing the original Omnia wifi cards for two new cards, both long (full size).

Caution, the card is an adapter especially for SSDs. I do not know whether this card works with WiFi cards.
Also, you cannot remove the pressed-in spacers as there is a risk of damaging the board.
1 Like
I have checked, it’s simply an extension of the slot and suitable for both wifi card and ssd drive. Thanks for the warning.
Thank you for starting the thread !
There are two types of mSATA SSD cards sizes directly compatible with the third slot (the one on the right near the CPU on the Turris Omnia PCB) mPCIe 52 pin connector :
small : 30 mm × 26,80 mm
medium : 30 mm × 50,95 mm
large would be 80 mm in length but that is only for m2 cards so it does not concern us.
all mSATA cards feature the same connector that is compatible with the mPCIe 52 pin connector so the only difference respective to the card is the length.Width of the cards is identical.
my Turris OMNIA board is marked as CZ11NIC23
bought new from retail in july 2024.
mine came with one medium size WiFy 6 card in the middle slot and one small size WiFy card in the third slot.
Small WiFy card is the same size as small mSATA card.
Medium size WiFy card is the same size as medium mSATA card
For my purposes I took the small WiFy from the third slot out and put in a medium sized mSATA 1TB drive to be used as an external drive in order to hopefully one day take the place of the integrated eMMC on the board.
The remaining issue is that the current support risers need to be moved from their 25 mm position to the upper 50 mm position for the medium sized mSATA card to be mounted securely with screws.
Alternatively the current ones may stay in place but new ones that are longer in height need to be mounted in the 50mm position.No new holes need to be drilled in the current version of the PCB but there needs to be a way to cleanly mount new support spacers at the 50mm position without damaging the board.
What type of support spacers is more suitable to be mounted at the 50mm position?
M2 or M3? what height?
As far as a future revision of the board is concerned there needs to be a more flexible mounting mechanism for cards.I’m thinking about one that permits easier movement between mounting positions or a system which accomodates both mounting positions simultaneously.
Currently my medium sized mSATA card sits unsecured by screws in the third slot.
It is electrically powered and recognized by the OS and the drive is mounted as an external drive in addition to the eMMC integrated storage unit so everything appears fine software wise.
As I mentioned above, I use M3 with a length of 6mm. But this also depends on your SSD. If the holes on the card are too small, you’ll need M2.
It looks like I’ll be getting the following :
- a few M2 6mm length
- a few M2 7mm length
- a few M3 6mm length
- a few M3 7mm length
- a few other metric dimensions
This way I’ll have a few spares for other projects too.
They are named Standoff Spacers for Printed Circuit Boards in case anyone else is interested.
See what @TomieCzech posted at nr.13 response.